5 April 2024
 Jan 19, 2024 01:25:00 AM
Rebuilding a Rolls-Royce Corniche | Body Repairs & Rear Axle Rebuild
Bumper and Wing Repair
The episode commences with Gary Mavers (Classic Obsession) addressing his Rolls-Royce Corniche's damaged bumper and wing. He specifically points out the crease in the chassis and the panel separation caused by backing into a pillar. Gary’s approach to repair emphasizes precision, particularly in dealing with the crease that potentially could have twisted the entire car. He discusses the paintwork, which was in a B state for 16 years, and his decision to block it down thoroughly rather than stripping it completely. As always, IntroCar, the international Rolls-Royce and Bentley parts specialists, is proud to support and provide the quality parts for all Gary's restoration projects.
Rear Axle Rebuild: Detailed Steps and Challenges
In this episode Gary tackles the intricate rear axle rebuild on the Rolls-Royce Corniche. Here are the key steps and challenges he encounters:
1. Removing Rear Hubs:
The process starts with removing the rear hubs. This involves detaching the handbrake cables at the trail arms, unbolting hub retainer bolts, tying up the brake calipers, and releasing the universal joints at each axle's end. A critical safety step is depressurizing the high-pressure brake system by turning on the ignition and pumping the pedal until the red brake lights illuminate. This meticulous process can be seen in detail on the video.
2. Fitting New Rear Brake Pads:
Gary demonstrates fitting new rear brake pads both with the caliper off the car and on the bench, and then on the opposite caliper while still on the car. He advises not to worry too much about the position of the spring clips and emphasizes using a bit of copper grease to prevent squealing, ensuring the pads stay in place. Watch this procedure online!
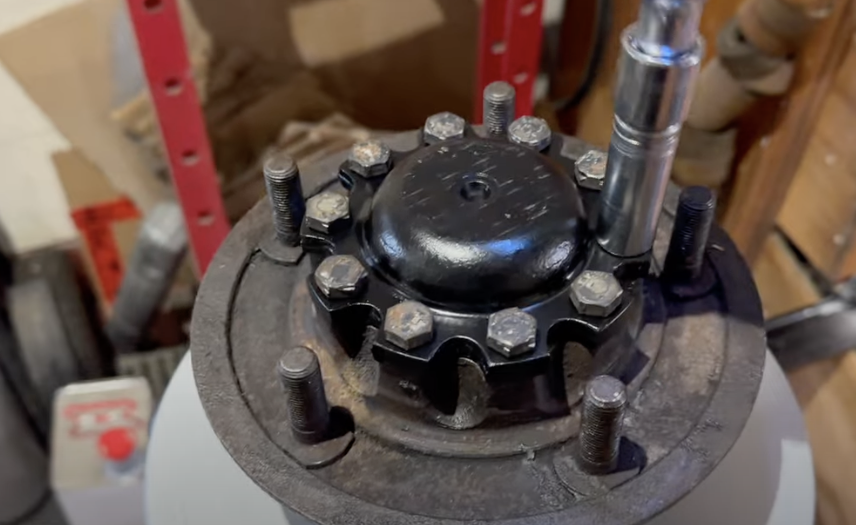
3. Using the Hub Splitter Tool:
Gary showcases the original Rolls-Royce hub splitter tool he acquired, which is integral for this project. He explains the process of heating, removing the Woodruff key, hub bolts, splitting the hub, and removing the short axle. Each step is crucial and is detailed thoroughly on the video.
4. Reassembly with Upgrades:
The reassembly includes fitting new races, an extra seal in a taller race (requiring the removal of the aluminum seat at the bottom of the short axle), and using heavy-duty grease from Lucas for the new brake disc. Gary emphasizes the importance of correct bolt torquing and careful bearing greasing.
5. Overcoming Challenges:
A significant challenge arises when the thread on the short axle strips, rendering it scrap. Gary advises caution against applying excessive heat, which could compromise the tempered steel axle. This part of the process illustrates the complexities of working with vintage luxury cars.
6. Final Adjustments and Safety Precautions:
The final adjustments include fitting new brake pads with the caliper in situ and ensuring the correct positioning of the little clips on the pads. Gary concludes by emphasizing the importance of safety and precision, especially when dealing with high torque and heat on components.
It's all About the Parts!
This Classic Obsession video is a detailed walkthrough of the rear axle rebuild of a Rolls-Royce Corniche, highlighting the technical expertise and challenges encountered and serves as a valuable resource for specialists in Rolls-Royce and Bentley restorations.
Gary' restorations are supported by IntroCar, the International Rolls-Royce and Bentley Parts Specialists: https://www.introcar.com.
Used in the video are the following parts:
- PC113547PA-X: Rear brake Disc https://www.introcar.com/rear-brake-disc-pc113547pa
- CD6396-X: Complete Rear Axle Set of Brake Pads https://www.introcar.com/brake-pad-kit-rear-cd6396
- UG11161-X Rear Hub O Ring : https://www.introcar.com/rear-hub-o-ring-ug11161
- UG13562/3-X: Rear Outer Wheel Bearing https://www.introcar.com/rear-outer-wheel-bearing-ug135623
- UG13564/5-X: Rear Rear Inner Wheel Bearing https://www.introcar.com/rear-inner-wheel-bearing-ug135645
- UR70222-X: Rear Hub Seal https://www.introcar.com/seal-rear-hub-ur70222
- UG10045-X: Sealing Washer https://www.introcar.com/sealing-washer-ug10045
- UR70221-X: Rear Hub Seal Retainer https://www.introcar.com/seal-retainer-rear-hub-ur70221
- UG13066-X: Driveshaft Lock Nut https://www.introcar.com/nut-end-yokedrive-shaft-ug13066
- CD6586OE-X Foot Operated Parking Brake Pads https://www.introcar.com/foot-operated-parking-brake-pads-cd6586oe
- CD4091-X Brakes Return Spring https://www.introcar.com/spring-return-brakes-cd4091
- CD4100-X Pad Return Spring https://www.introcar.com/spring-pad-ret-cd4100
- CD4099 Lever Return Spring https://www.introcar.com/spring-lever-return-cd4099
For all your parts needs visit IntroCar.com and filter by your specific Rolls-Royce or Bentley model to see specific catalogues for your car. Use code “MAVERS” for site wide discount on Rolls-Royce and Bentley parts at IntroCar.com.
Posted in: RR Technical - Rolls-Royce & Bentley
0 comments